
ウィジェットを配置するには、pack,grid,placeの3つのメソッドがありますが、ここではpackについて説明します。(個人的にはpack, grid, placeのうち、packが一番使いやすいと思っています。)
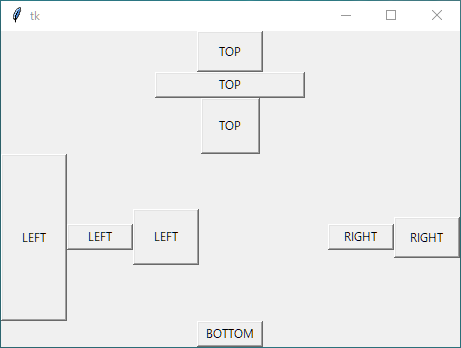
packは、下図のように、ボタンやラベルなどのウィジェットを上、下、左、右方向に積み木のように、重ねて配置します。
以下に簡単なサンプルを示します。
import tkinter as tk

class Application(tk.Frame):
    def __init__(self, master = None):
        super().__init__(master)

        self.master.geometry("250x250")

        # ボタンの作成
        button_top = tk.Button(self.master, text = "TOP", width = 8)
        button_bottom = tk.Button(self.master, text = "BOTTOM", width = 8)
        button_left = tk.Button(self.master, text = "LEFT", width = 8)
        button_right = tk.Button(self.master, text = "RIGHT", width = 8)

        # ウィジェットの配置
        button_top.pack(side = tk.TOP)
        button_bottom.pack(side = tk.BOTTOM)
        button_left.pack(side = tk.LEFT)
        button_right.pack(side = tk.RIGHT)

if __name__ == "__main__":
    root = tk.Tk()
    app = Application(master = root)
    app.mainloop()
(実行画面)
構文
ウィジェット.pack(オプション1 = 設定値, オプション2 = 設定値,・・・)オプション
| オプション名 | 説明 |
| after | すでに配置されているウィジェットの次にウィジェットを配置する |
| anchor | sideで示した領域内のウィジェットの配置方向を指定します。 【設定値】tk.N, tk.S, tk.W, tk.E, tk.NW, tk.NE, tk.SW, tk.SE, tk.CENTER 【初期値設定値】tk.CENTER |
| before | すでに配置されているウィジェットの前にウィジェットを配置する |
| expand | ウィジェットを配置する領域を残りの領域全体に広げるかどうかを指定します。 【設定値】True, False 【初期値設定値】False |
| fill | ウィジェットを領域の横、縦、または両方の方向の幅、高さに合わせてに大きくするか?設定します。 【設定値】tk.X, tk.Y, tk.BOTH, tk.NONE 【初期値設定値】tk.NONE |
| in_ | ウィジェット作成時に親ウィジェットを指定せずに、配置時(pack時)に親ウィジェットを指定します。 |
| ipadx | ウィジェットの内側の横方向の隙間を設定します。 |
| ipady | ウィジェットの内側の縦方向の隙間を設定します。 |
| padx | ウィジェットの外側の横方向の隙間を設定します。 値で設定すると、両側の隙間を設定します。 タプルで(左, 右)のように設定すると、それぞれの隙間を指定できます。 |
| pady | ウィジェットの外側の縦方向の隙間を設定します。 値で設定すると、上下の隙間を設定します。 タプルで(上, 下)のように設定すると、それぞれの隙間を指定できます。 |
| side | ウィジェットの配置方向を、上、下、左、右の中から指定します。 【設定値】tk.TOP, tk.BOTTOM, tk.LEFT, tk.RIGHT 【初期値設定値】tk.TOP |
side
sideではウィジェットの上下左右の配置方向を指定しますが、配置の順番が重要となります。
最初のプログラムの配置部分(packの部分)のプログラムは
# ウィジェットの配置
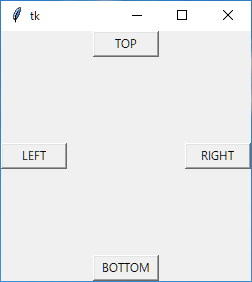
button_top.pack(side = tk.TOP)
button_bottom.pack(side = tk.BOTTOM)
button_left.pack(side = tk.LEFT)
button_right.pack(side = tk.RIGHT)となっていますが、この結果は以下のような感じでした。
この配置の順番を入れ替えて、以下のようなプログラムにすると
# ウィジェットの配置
button_left.pack(side = tk.LEFT)
button_top.pack(side = tk.TOP)
button_right.pack(side = tk.RIGHT)
button_bottom.pack(side = tk.BOTTOM)
実行結果は
のようになり、バラバラな配置になります。
なぜ、このようになるのか?順を追って見ていきます。
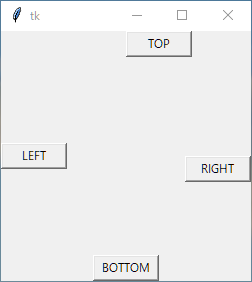
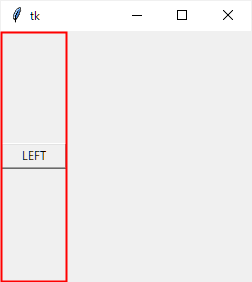
最初にボタンを左側にpackしています。
button_left.pack(side = tk.LEFT)この時点で、目には見えませんが、packした占有領域としては、親ウィジェットの左側の上から下までボタンの幅分、占有されています。
ボタン位置の上下方向はanchorで指定できますが、指定しない場合、初期値の中央(tk.CENTER)が適応されます。
次に配置されるウィジェットは、この残りの領域に対して配置されます。
つまり次のボタンを上側に配置以下のように配置すると、残りの領域の上側が占有されます。
button_top.pack(side = tk.TOP)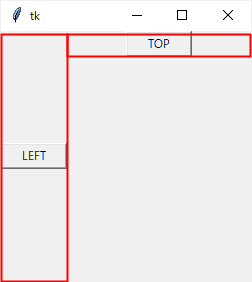
同様にして、次に右側に配置すると
button_right.pack(side = tk.RIGHT)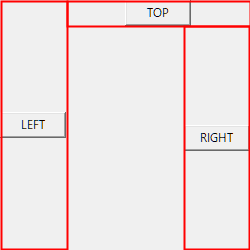
続いて下側
button_bottom.pack(side = tk.BOTTOM)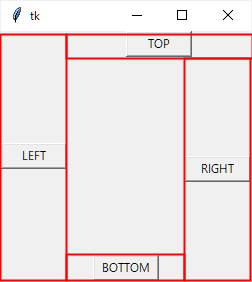
というように、pack()のsideでは残っている領域の上側、下側、左側、右側の上から下まで、もしくは左から右まで占有している事に注意が必要です。
anchor
anchorはsideとも似ているのですが、sideの説明で示した占有領域内(赤く囲った部分)の配置方向を方角を使って指定します。
これを踏まえた上で、以下のプログラムを実行してみます。
import tkinter as tk

class Application(tk.Frame):
    def __init__(self, master = None):
        super().__init__(master)

        self.master.geometry("250x250")

        # ボタンの作成
        button_N = tk.Button(self.master, text = "N", width = 8)
        button_S = tk.Button(self.master, text = "S", width = 8)
        button_W = tk.Button(self.master, text = "W", width = 8)
        button_E = tk.Button(self.master, text = "E", width = 8)

        # ウィジェットの配置
        button_N.pack(anchor = tk.N)
        button_S.pack(anchor = tk.S)
        button_W.pack(anchor = tk.W)
        button_E.pack(anchor = tk.E)

if __name__ == "__main__":
    root = tk.Tk()
    app = Application(master = root)
    app.mainloop()
(実行結果)
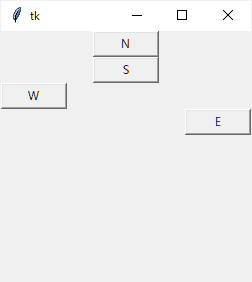
すると、特に、tk.Sを指定した時に違和感がありますよね。
さらに、tk.Wとtk.Eの上下方向がズレてるし。。
これについても、packで占有される領域を示すと理解しやすくなります。
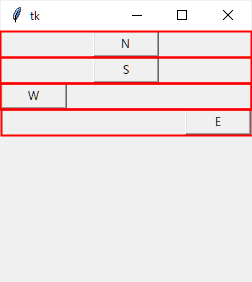
pack()では、sideオプションを指定しないとtk.TOPになるので、全て上側にウィジェットが積み重なります。
anchorオプションはあくまでも、占有領域内の配置方向を指定するので、side = tk.TOP のときは、上下方向の指定(tk.N, tk.S)はtk.CENTERと同様になります。
同様にして side = tk.LEFT もしくは side = tk.RIGHT のときは、左右方向の指定(tk.W, tk.E) も tk.CENTERと同様になります。
ただし、次に示す expand = True とした時は、上下、左右、斜め方向の指定が有効になります。
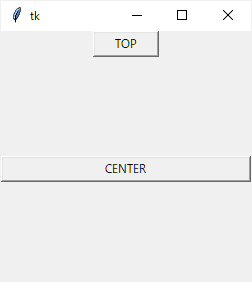
expand
expandは expand = Trueとした時、残っている領域全てを占有領域とします。
(サンプル)
import tkinter as tk

class Application(tk.Frame):
    def __init__(self, master = None):
        super().__init__(master)

        self.master.geometry("250x250")

        # ボタンの作成
        button_top = tk.Button(self.master, text = "TOP", width = 8)
        button_center = tk.Button(self.master, text = "CENTER", width = 8)

        # ウィジェットの配置
        button_top.pack()
        button_center.pack(expand = True)

if __name__ == "__main__":
    root = tk.Tk()
    app = Application(master = root)
    app.mainloop()
(実行結果)
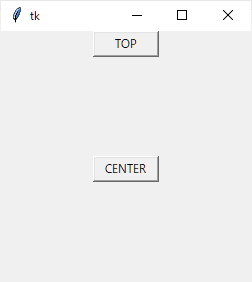
これも占有領域を書くと分かりやすいと思います。

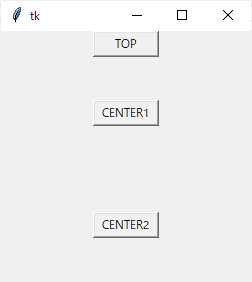
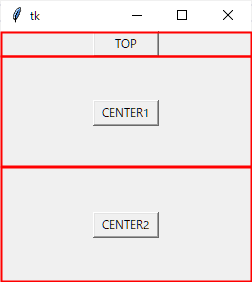
2つ以上のウィジェットを expand = True にして配置すると、領域を均等分割して配置されます。
(サンプル)
import tkinter as tk

class Application(tk.Frame):
    def __init__(self, master = None):
        super().__init__(master)

        self.master.geometry("250x250")

        # ボタンの作成
        button_top = tk.Button(self.master, text = "TOP", width = 8)
        button_center1 = tk.Button(self.master, text = "CENTER1", width = 8)
        button_center2 = tk.Button(self.master, text = "CENTER2", width = 8)

        # ウィジェットの配置
        button_top.pack()
        button_center1.pack(expand = True)
        button_center2.pack(expand = True)

if __name__ == "__main__":
    root = tk.Tk()
    app = Application(master = root)
    app.mainloop()
(実行結果)
これも占有領域を書いてみます。
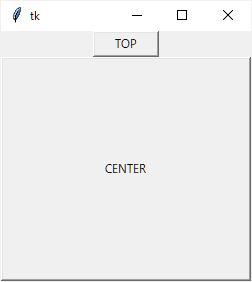
fill
fillは、これまで説明してきた占有領域に対して、ウィジェットの幅、高さ、もしくは両方を合わせます。
(サンプル)
import tkinter as tk

class Application(tk.Frame):
    def __init__(self, master = None):
        super().__init__(master)

        self.master.geometry("250x250")

        # ボタンの作成
        button_top = tk.Button(self.master, text = "TOP", width = 8)
        button_center = tk.Button(self.master, text = "CENTER", width = 8)

        # ウィジェットの配置
        button_top.pack()
        button_center.pack(expand = True, fill = tk.X)

if __name__ == "__main__":
    root = tk.Tk()
    app = Application(master = root)
    app.mainloop()
(実行結果)
fill = tk.Y のとき
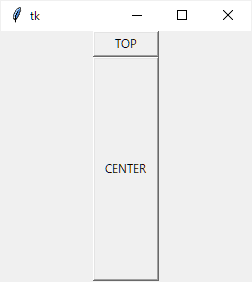
fill = tk.BOTH
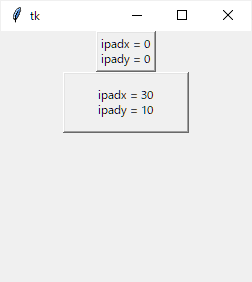
ipadx, ipady
ウィジェットの内側の隙間の量を指定します。
ipadxが横方向、ipadyが縦方向の隙間となります。
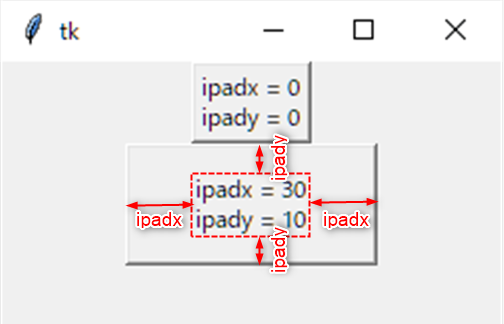
隙間を指定することで、ウィジェットの大きさも大きくなります。
(サンプル)
import tkinter as tk

class Application(tk.Frame):
    def __init__(self, master = None):
        super().__init__(master)

        self.master.geometry("250x250")

        # ボタンの作成
        button_ipad0 = tk.Button(self.master, text = "ipadx = 0\nipady = 0")
        button_ipad  = tk.Button(self.master, text = "ipadx = 30\nipady = 10")

        # ウィジェットの配置
        button_ipad0.pack()
        button_ipad.pack(ipadx = 30, ipady = 10)

if __name__ == "__main__":
    root = tk.Tk()
    app = Application(master = root)
    app.mainloop()
(実行結果)
padx, pady
ウィジェットの外側の隙間の量を指定します。
padxが横方向、padyが縦方向の隙間となります。

(サンプル)
import tkinter as tk

class Application(tk.Frame):
    def __init__(self, master = None):
        super().__init__(master)

        self.master.geometry("250x250")

        # ボタンの作成
        button1 = tk.Button(self.master, text = "Button1")
        button2 = tk.Button(self.master, text = "Button2")
        button3 = tk.Button(self.master, text = "Button3")
        button4 = tk.Button(self.master, text = "Button4")
        button_pad  = tk.Button(self.master, text = "padx = 30\npady = 10")

        # ウィジェットの配置
        button1.pack(side = tk.TOP, expand = True, fill = tk.BOTH)
        button4.pack(side = tk.BOTTOM, expand = True, fill = tk.BOTH)
        button2.pack(side = tk.LEFT, expand = True, fill = tk.BOTH)
        button_pad.pack(side = tk.LEFT, padx = 30, pady = 10)
        button3.pack(side = tk.LEFT, expand = True, fill = tk.BOTH)

if __name__ == "__main__":
    root = tk.Tk()
    app = Application(master = root)
    app.mainloop()
(実行結果)

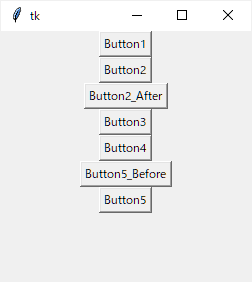
after, before
ウィジェットの配置は順番が大事と説明してきましたが、すでに配置されているウィジェットの間に挿入して配置する場合に用います。
afterは指定したウィジェットの次にウィジェットを配置します。
beforeは指定したウィジェットの前にウィジェットを配置します。
(サンプル)
import tkinter as tk

class Application(tk.Frame):
    def __init__(self, master = None):
        super().__init__(master)

        self.master.geometry("250x250")

        # ボタンの作成
        button1 = tk.Button(self.master, text = "Button1")
        button2 = tk.Button(self.master, text = "Button2")
        button3 = tk.Button(self.master, text = "Button3")
        button4 = tk.Button(self.master, text = "Button4")
        button5 = tk.Button(self.master, text = "Button5")

        button2_after = tk.Button(self.master, text = "Button2_After")
        button5_before = tk.Button(self.master, text = "Button5_Before")


        # ウィジェットの配置
        button1.pack()
        button2.pack()
        button3.pack()
        button4.pack()
        button5.pack()
        # すでに配置されているウィジェットの次に配置する
        button2_after.pack(after = button2)
        # すでに配置されているウィジェットの前に配置する
        button5_before.pack(before = button5)

if __name__ == "__main__":
    root = tk.Tk()
    app = Application(master = root)
    app.mainloop()
(実行結果)
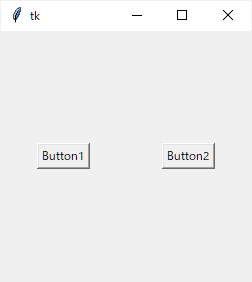
in_
ウィジェット作成時に親ウィジェットを指定せずに、配置時(pack時)に親ウィジェットを指定します。
(サンプル)
import tkinter as tk

class Application(tk.Frame):
    def __init__(self, master = None):
        super().__init__(master)

        self.master.geometry("250x250")

        # 左側のフレーム
        frame_left = tk.Frame(self.master)
        # 右側のフレーム
        frame_right = tk.Frame(self.master)

        # ボタンの作成
        button1 = tk.Button(frame_left, text = "Button1")
        button2 = tk.Button(text = "Button2") # ここでは親のウィジェットを指定していない

        # ウィジェットの配置
        button1.pack()
        button2.pack(in_ = frame_right) # ここでは親のウィジェットを指定

        # フレームの配置
        frame_left.pack(side = tk.LEFT, expand = True)
        frame_right.pack(side = tk.LEFT, expand = True)

if __name__ == "__main__":
    root = tk.Tk()
    app = Application(master = root)
    app.mainloop()
(実行結果)
まとめ
ここまで、ウィジェットの配置は順番が重要だと説明してきましたが、実際には1つの親ウィジェットに、様々なオプションを駆使してウィジェットを配置するのは、かなり困難です。
そのため、いくつかのフレーム(Frame)を使って大枠を作成し、各フレームにウィジェットを配置すると比較的簡単に配置できます。
そこで、私がC#では良く作っていたウィンドウのレイアウトを、フレームをいくつか使いサンプルを作成してみました。
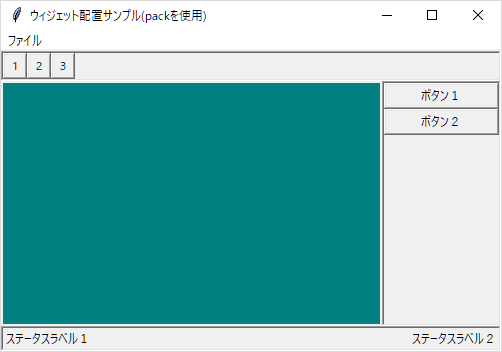
(サンプルプログラム)
import tkinter as tk
from tkinter import filedialog
import os


class Application(tk.Frame):
    def __init__(self, master = None):
        super().__init__(master)

        # ウィンドウタイトル
        self.master.title("ウィジェット配置サンプル(packを使用)")

        self.master.geometry("500x300")

        # メニューの作成
        self.create_menu()
        # ツールバーの作成
        self.create_tool_bar()
        # ステータスバーの作成
        self.create_status_bar()
        # サイドパネル
        self.create_side_panel()

        # 残りの領域にキャンバスを作成
        canvas = tk.Canvas(self.master, background="#008080")
        canvas.pack(expand=True,  fill=tk.BOTH)

    def create_menu(self):
        ''' メニューの作成'''
        menu_bar = tk.Menu(self)

        file_menu = tk.Menu(menu_bar, tearoff = tk.OFF)
        menu_bar.add_cascade(label="ファイル", menu = file_menu)

        file_menu.add_command(label = "開く", command = self.menu_open_click, accelerator = "Ctrl+O")
        file_menu.add_separator() # セパレータ
        file_menu.add_command(label = "終了", command = self.master.destroy)
        # ショートカットの設定
        menu_bar.bind_all("", self.menu_open_click)

        # 親のメニューに設定
        self.master.config(menu = menu_bar)

    def menu_open_click(self, event=None):
        ''' ファイルを開く'''

        # ファイルを開くダイアログ
        filename = tk.filedialog.askopenfilename(
            initialdir = os.getcwd() # カレントディレクトリ
            )
        print(filename)

    def create_tool_bar(self):
        ''' ツールバー'''

        frame_tool_bar = tk.Frame(self.master, borderwidth = 2, relief = tk.SUNKEN)

        button1 = tk.Button(frame_tool_bar, text = "1", width = 2)
        button2 = tk.Button(frame_tool_bar, text = "2", width = 2)
        button3 = tk.Button(frame_tool_bar, text = "3", width = 2)

        button1.pack(side = tk.LEFT)
        button2.pack(side = tk.LEFT)
        button3.pack(side = tk.LEFT)

        frame_tool_bar.pack(fill = tk.X)

    def create_status_bar(self):
        '''ステータスバー'''
        frame_status_bar = tk.Frame(self.master, borderwidth = 2, relief = tk.SUNKEN)

        self.label1 = tk.Label(frame_status_bar, text = "ステータスラベル1")
        self.label2 = tk.Label(frame_status_bar, text = "ステータスラベル2")

        self.label1.pack(side = tk.LEFT)
        self.label2.pack(side = tk.RIGHT)

        frame_status_bar.pack(side = tk.BOTTOM, fill = tk.X)

    def create_side_panel(self):
        '''サイドパネル'''
        side_panel = tk.Frame(self.master, borderwidth = 2, relief = tk.SUNKEN)

        button1 = tk.Button(side_panel, text = "ボタン1", width = 15)
        button2 = tk.Button(side_panel, text = "ボタン2", width = 15)

        button1.pack()
        button2.pack()

        side_panel.pack(side = tk.RIGHT, fill = tk.Y)


if __name__ == "__main__":
    root = tk.Tk()
    app = Application(master = root)
app.mainloop() 
コメント
分かりやすかった、ありがとうございます!!
Keep up the good work
ありがとうございます!!
ちょっとうれしいです。