
画像(Bitmapオブジェクト)を描画するには、DrawImageメソッドを用いますが、DrawImageメソッドは30個も定義があり、使うと意図しない動きをする定義も含まれています。
DrawImage(Image image, PointF point);
DrawImage(Image image, Rectangle rect);
DrawImage(Image image, PointF[] destPoints);
DrawImage(Image image, Point[] destPoints);
DrawImage(Image image, RectangleF rect);
DrawImage(Image image, Point point);
DrawImage(Image image, float x, float y);
DrawImage(Image image, int x, int y);
DrawImage(Image image, Rectangle destRect, Rectangle srcRect, GraphicsUnit srcUnit);
DrawImage(Image image, RectangleF destRect, RectangleF srcRect, GraphicsUnit srcUnit);
DrawImage(Image image, PointF[] destPoints, RectangleF srcRect, GraphicsUnit srcUnit);
DrawImage(Image image, Point[] destPoints, Rectangle srcRect, GraphicsUnit srcUnit);
DrawImage(Image image, float x, float y, float width, float height);
DrawImage(Image image, Point[] destPoints, Rectangle srcRect, GraphicsUnit srcUnit, ImageAttributes imageAttr);
DrawImage(Image image, int x, int y, int width, int height);
DrawImage(Image image, int x, int y, Rectangle srcRect, GraphicsUnit srcUnit);
DrawImage(Image image, PointF[] destPoints, RectangleF srcRect, GraphicsUnit srcUnit, ImageAttributes imageAttr);
DrawImage(Image image, float x, float y, RectangleF srcRect, GraphicsUnit srcUnit);
DrawImage(Image image, PointF[] destPoints, RectangleF srcRect, GraphicsUnit srcUnit, ImageAttributes imageAttr, DrawImageAbort callback);
DrawImage(Image image, Point[] destPoints, Rectangle srcRect, GraphicsUnit srcUnit, ImageAttributes imageAttr, DrawImageAbort callback);
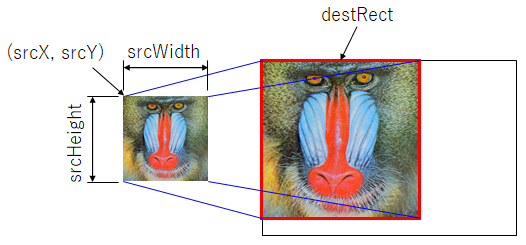
DrawImage(Image image, Rectangle destRect, float srcX, float srcY, float srcWidth, float srcHeight, GraphicsUnit srcUnit);
DrawImage(Image image, Point[] destPoints, Rectangle srcRect, GraphicsUnit srcUnit, ImageAttributes imageAttr, DrawImageAbort callback, int callbackData);
DrawImage(Image image, Rectangle destRect, int srcX, int srcY, int srcWidth, int srcHeight, GraphicsUnit srcUnit);
DrawImage(Image image, PointF[] destPoints, RectangleF srcRect, GraphicsUnit srcUnit, ImageAttributes imageAttr, DrawImageAbort callback, int callbackData);
DrawImage(Image image, Rectangle destRect, int srcX, int srcY, int srcWidth, int srcHeight, GraphicsUnit srcUnit, ImageAttributes imageAttr);
DrawImage(Image image, Rectangle destRect, float srcX, float srcY, float srcWidth, float srcHeight, GraphicsUnit srcUnit, ImageAttributes imageAttrs);
DrawImage(Image image, Rectangle destRect, float srcX, float srcY, float srcWidth, float srcHeight, GraphicsUnit srcUnit, ImageAttributes imageAttrs, DrawImageAbort callback);
DrawImage(Image image, Rectangle destRect, int srcX, int srcY, int srcWidth, int srcHeight, GraphicsUnit srcUnit, ImageAttributes imageAttr, DrawImageAbort callback);
DrawImage(Image image, Rectangle destRect, float srcX, float srcY, float srcWidth, float srcHeight, GraphicsUnit srcUnit, ImageAttributes imageAttrs, DrawImageAbort callback, IntPtr callbackData);
DrawImage(Image image, Rectangle destRect, int srcX, int srcY, int srcWidth, int srcHeight, GraphicsUnit srcUnit, ImageAttributes imageAttrs, DrawImageAbort callback, IntPtr callbackData);DrawImageメソッドには、大まかには
●描画先の左上の座標を指定するもの
●描画先の左上の座標、幅、高さを指定するもの
●描画先の左上の座標、描画元の領域を指定するもの
●描画先の左上の座標、幅、高さ、描画元の領域を指定するもの
●上記の座標にint型で指定するもの
●上記の座標にfloat型で指定するもの
●上記にDrawImageAbort を指定するもの
の組み合わせとなります。
DrawImageAbortに関しては、使った事がないので、いまいち理解できていないのですが、描画先の左上の座標のみを指定する場合は、画像ファイルのDPI情報(dot per inch, 画像の解像度)に合わせて表示されるので、注意が必要です。(というより使わない方が良いです)
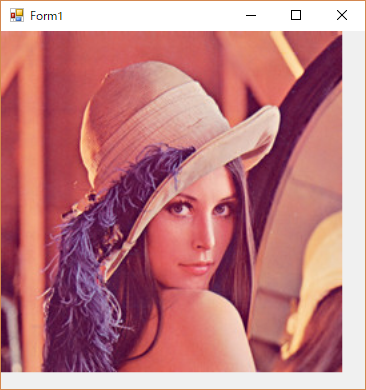
例えば、下記のようなコードで72dpiと96dpiのファイルをそれぞれ開くと、
pictureBox1.Image = new Bitmap(pictureBox1.Width, pictureBox1.Height);

using (var bmp = new Bitmap(@"C:\Temp\Lenna.jpg"))
using (var g = Graphics.FromImage(pictureBox1.Image))
{
    g.DrawImage(bmp, 0, 0);
}
(ファイルが72dpiのとき)
(ファイルが96dpiのとき)
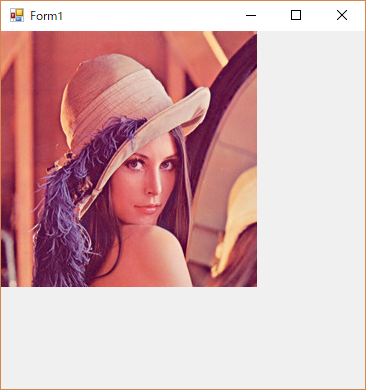
のように2つの画像とも画素数は同じなのですが、表示される大きさが異なります。
Windowsでは96dpi基準なので、96dpiのファイルだけを表示していると気が付きませんが、macが72dpiのため、たまに表示サイズがおかしくなる場合があるので、意図的にdpiに基づいて表示する場合以外は必ず
左上の座標、画像の幅、高さ
を指定するメソッドを用いるようにして下さい。
(修正したコード例)
pictureBox1.Image = new Bitmap(pictureBox1.Width, pictureBox1.Height);
using (var bmp = new Bitmap(@"C:\Temp\Lenna.jpg"))
using (var g = Graphics.FromImage(pictureBox1.Image))
{
g.DrawImage(bmp, 0, 0, bmp.Width, bmp.Height);
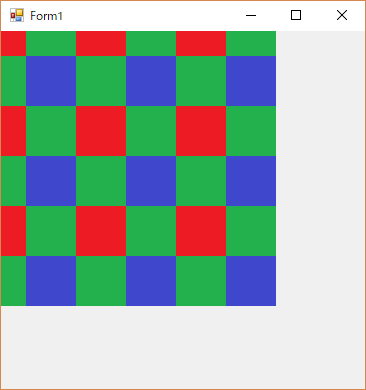
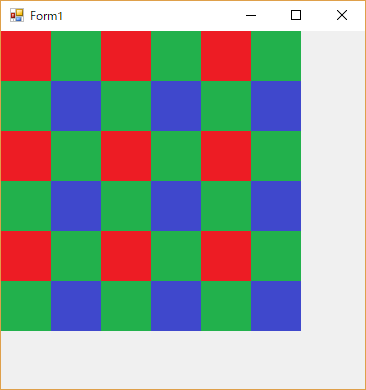
}さらに画像を拡大/縮小して表示する場合は、描画先の幅、高さに表示倍率を掛けることで、拡大縮小することが出来ますが、下記のようなコードで拡大表示すると、画像の上と左側が0.5画素分切れて表示されてしまいます。
(拡大表示例)
pictureBox1.Image = new Bitmap(pictureBox1.Width, pictureBox1.Height);

using (var bmp = new Bitmap(@"C:\Temp\test.jpg"))  // 6x6画素の画像
using (var g = Graphics.FromImage(pictureBox1.Image))
{
    // 補間モードの設定(各画素が見えるように)
    g.InterpolationMode = System.Drawing.Drawing2D.InterpolationMode.NearestNeighbor;
    // 50倍で描画
    g.DrawImage(bmp, 0, 0, bmp.Width * 50, bmp.Height * 50);
}
実行結果
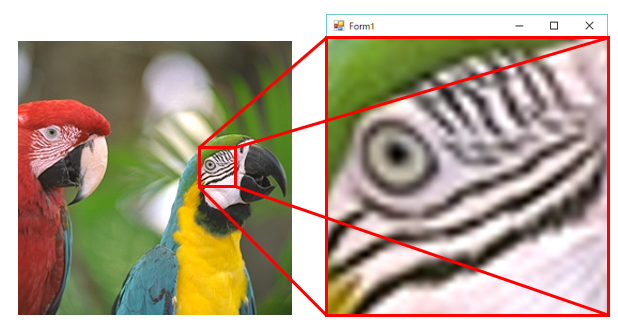
このようにならたいためには、こちらのページ↓
でも書いていますが、PixelOffsetModeを指定するか、元の画像の座標を0.5画素ズラすかのいづれかの方法となります。
ここでは、元の画像の座標を0.5画素ずらす方法の例を示すと、
(修正したコード例)
pictureBox1.Image = new Bitmap(pictureBox1.Width, pictureBox1.Height);

using (var bmp = new Bitmap(@"C:\Temp\test.jpg"))  // 6x6画素の画像
using (var g = Graphics.FromImage(pictureBox1.Image))
{
    // 補間モードの設定(各画素が見えるように)
    g.InterpolationMode = System.Drawing.Drawing2D.InterpolationMode.NearestNeighbor;
    // 描画元を0.5画素ずらして50倍で描画
  g.DrawImage(
        bmp,
        new RectangleF(0f, 0f, bmp.Width * 50f, bmp.Height * 50f),
        new RectangleF(-0.5f, -0.5f, bmp.Width, bmp.Height),
        GraphicsUnit.Pixel);
}
実行結果
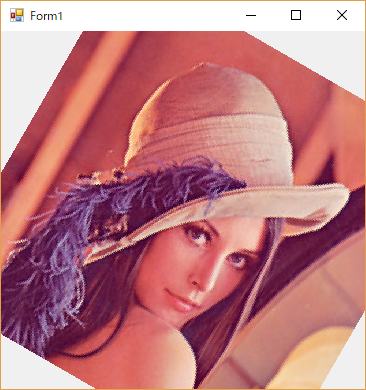
さらに面白い使い方として、描画先の座標に画像の左上、右上、左下の座標を指定することで、画像の平行移動、拡大縮小、拡大、せん断までのアフィン変換を実現することもできます。
(コード例)
pictureBox1.Image = new Bitmap(pictureBox1.Width, pictureBox1.Height);

using (var bmp = new Bitmap(@"C:\Temp\Lenna.jpg"))
using (var g = Graphics.FromImage(pictureBox1.Image))
{
    // 補間モードの設定(各画素が見えるように)
    g.InterpolationMode = System.Drawing.Drawing2D.InterpolationMode.NearestNeighbor;
    // 描画元の領域
    var srcRect = new RectangleF(-0.5f, -0.5f, bmp.Width, bmp.Height);

    // 描画先の座標の初期値(左上、右上、左下の順)
    var points = new PointF[]
    {
        new PointF(0, 0),
        new PointF(bmp.Width, 0),
        new PointF(0, bmp.Height),
    };

    // 描画先の座標をアフィン変換で求める
    var mat = new System.Drawing.Drawing2D.Matrix();
    // 画像の中心を基点に回転
    mat.RotateAt(
        30f,
        //new PointF((bmp.Width - 1) / 2f, (bmp.Height - 1) / 2f),
        new PointF(bmp.Width / 2f, bmp.Height / 2f),
        System.Drawing.Drawing2D.MatrixOrder.Append
        );
    // 拡大
    mat.Scale(1.5f, 1.5f, System.Drawing.Drawing2D.MatrixOrder.Append);
    // 3点のアフィン変換
    mat.TransformPoints(points);

    // 描画
    g.DrawImage(
        bmp,
        points,
        srcRect,
        GraphicsUnit.Pixel
        );
}
実行結果
まとめ
●描画先の座標指定では、左上の座標のみの指定は用いないこと
必ず左上の座標、幅、高さを指定すること。
●画像を拡大する場合は、0.5画素分、表示がずれる事を考慮すること
●描画先の座標に画像の左上、右上、左下を指定することで、画像のアフィン変換も実現できる。
関連ページ
←画像処理のためのC#テクニックへ戻る
コメント
[…] 【C#】画像(Bitmapクラス)のPictureBoxへの描画 […]